- Vancouver 360-369-3586
- Portland 503-925-3504
- Fast No Obligation Estimate
- Home
- About
- Plumbing Services
- Emergency Plumbing
- Drain Cleaning
- Leak Detection & Repair
- Sewer Line Repair
- Repiping
- Trenchless Pipe Repair & Replacement
- Water Heater Repair
- Water Heater Installation
- Main Water Line Repair
- Main Water Line Replacement
- Garbage Disposal Repair & Installation
- Faucet & Fixture Installation
- Toilet Installation
- Trenchless Boring Services
- New Construction
- Commercial Plumbing
- Water Filtration and Softening
- Water Damage Restoration
- Electrical
- Heating & Cooling
- Restoration
- Service Area
- Reviews
- Coupons
- Contact Us
- Membership

Two DIY Plumbing Fixes
by Sarkinen Plumbing | May 29, 2018
You Probably Won’t Need A Plumber For These Repairs

As plumbers, we can’t advise that homeowners try to take on plumbing challenges alone. If nothing else, consulting with a plumber to make sure there aren’t any avoidable mishaps on the horizon is good practice.
But at the same time, there are a few jobs out there that we think homeowners can do by themselves if they just had the right tools and the right direction. This article covers two at-home, DIY repairs that may seem daunting but are actually manageable with the right preparation.
1. Repairing Your Kitchen Sink Drain
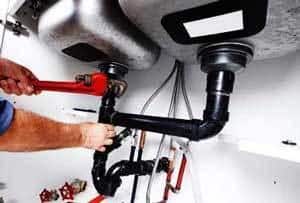
A good rule of thumb for sink drain repairs is to always be asking one thing: “Does this need a gasket?” Your kitchen sink drain is actually very simple but the water-tight seal is only made possible through the use of rubber gaskets around the connecting points. As long as you remember the gaskets, you’ll likely make it through kitchen sink drain repairs without issue. Now that we know that, here’s how you do it:
1. Remove the basket strainer from the sink
The first part of this is to remove the brass nut from the underside of the basket strainer using a brass nut remover – a specialized tool for the job. Your channel locks may work but it may not be advisable to use those. After you’ve removed the brass nut, the strainer should come out easily.
2. Adhere your new basket strainer to the sink

Use plumbing putty to stick the basket strainer to the open hole in your sink. The plumbing putty holds the strainer in place. Duck down beneath the sink and lock in the assembly using the rubber gasket and brass nut. Sandwich the gasket with the retaining brass nut. You may need to tighten the brass nut with the wrench used to remove the strainer nut. Your strainer is now locked into the sink.
Connect Your Strainer to the Trap
Your strainer is connected to your trap via (usually) a metal pipe, either copper or brass. The pipe will be locked into place using another combination of nuts and rubber gaskets to form a strong seal.
If you haven’t done it yet, you will need to remove the original connecting pipe from the existing system. These pipes are common sites of wear-related leaks and may be the source of your leak. Most likely you’ll be able to do this by untightening the existing nuts from both ends but if they are fused into place, a plumber might be needed to saw out the pipe.
There is one caveat to this process. While most pipes are a standard size, there is a chance your new pipe may need its size cut down to fit into place.
A reason you may need a plumber:
Over time, the brass nut may become permanently stuck and require some “advanced” techniques to dislodge it. There is also the possibility that the connecting pipe could need manual adjustment to size.
Installing a New Toilet
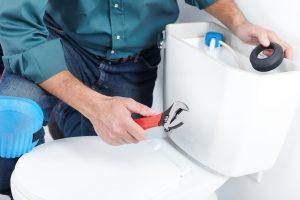
This one is understandably a job that people avoid doing themselves, but it’s actually pretty straightforward. Here are the basic steps to replacing a toilet. These steps assume a standard toilet size
1. Turn off the water and empty the toilet of water

At the water supply valve attached to the wall, turn it until it’s off. Give the toilet a flush to empty the bowl. The water in the tank can be removed with a sponge or sucked out using a large baster. With the bowl and the tank empty, your toilet is now dry and ready to disconnect. You may also need to use the sponge to remove the remaining water from the bowl.
2. Disconnect the toilet from the wall and remove the tank
Detach the supply valve from the bottom of the tank and remove the bolts. Your toilet is now standing alone. Check for any extra connections between the tank and the base. If there aren’t any, carefully lift the tank from the base and set aside. Take care here, as the tank can be heavy. After this step, you should be looking at just a bowl without its top half.
3. Remove the nuts and bolts that attach the bowl to the floor.
After you’ve removed the connections, rock the bowl out of place until it is dislodged and loose. Set aside the bowl. Again, take care here as the bowl can be heavy. You should now be looking at a hole in the floor where the toilet once was.
4. Stuff the hole with a cloth and scrape up the residue from the hole
There are gasses that rise from the sewer that you want to block from coming into the house. Stuff the hole in the ground to prevent them from coming up. There will also be wax from the previous installation. In order for your new seal to work, scrape off the wax and clean the site. You are now ready to put in the new toilet.
5. Put in a new wax ring around the base of the toilet
Your new toilet may come with one, or it may come separately, either way, don’t forget to put in the wax ring before installing the toilet.
6. Reverse The Steps
At this point, putting in your new toilet is just a matter of reversing the steps. This is the perfect time to replace all of the bits and pieces (or even retile the floor). Just be sure to double-check your work and make sure everything is connected before flushing any water through.
While these two plumbing jobs may seem intimidating at first, they’re actually two of the most straightforward and shouldn’t require any work on the internal plumbing of your home.
And just in case: While we always like seeing DIY plumbing as much as anyone, if you are unsure about any step in the process, call in a professional. There may be small differences in the plumbing that require an expert to notice. Be careful, ask questions and have fun!
Recent Posts
- Vancouver 360-369-3586
- Portland 503-925-3504
- 9502 NE 72nd Ave Vancouver, WA 98665
It’s as easy as 1, 2, 3!
- Complete the form below so we can schedule your service appointment.
- You will receive an email confirming your appointment details.
- We will text you 30 minutes prior to the technician’s arrival.
Recognition & Awards
customer reviews
![]()
“Highly satisfied with all the work done! Pleasant, friendly worker’s—all work completed lightning-quick and stayed on site until all issues were fully taken care of! Hardly knew anyone was here after work was finished! Can’t go wrong with these people!! Will use again when needed!”
Leonard K.
Vancouver Location
Proudly Serving
Portland and Vancouver
from Wilsonville to Longivew &
Hillsboro to Gresham
UBI # 602-521-027
OR Contractor Lic# 170052 (CCB)
WA Contractor Lic# SARKIPI946MF
OR Plumber Lic# PB115
Customer Satisfaction
4.6 stars - Based on 227 Reviews
![]()
Vote Here For Sarkinen Plumbing in the 2020 Best Of Clark County!
Plumbing Services
- Emergency Plumbing
- Drain Cleaning
- Leak Detection & Repair
- Sewer Line Repair
- Repiping
- Trenchless Pipe Repair
- Water Heater Repair
- Water Heater Installation
- Main Water Line Repair
- Main Water Line Replacement
- Garbage Disposal Repair & Installation
- Faucet & Fixture Installation
- Toilet Installation
- Trenchless Boring
- New Construction Plumbing
- Commercial Plumbing
- Water Damage Restoration
SW Washington Service Areas
Oregon Service Areas
Contact Information
Sarkinen PlumbingVancouver
9502 NE 72nd Ave
Vancouver, WA 98665
Phone: 360-369-3586
Portland
Phone: 503-925-3504
Hours of Operation
Monday - Sunday 24-hours


